
Acoustic Design for Home Cinema – How We Do It and Why
Let’s start our “knowledge base” with a case that is most applicable to private clients, Home Cinemas! Before we go into detailed description about how we design our treatment, I can guess what most readers would be thinking.
“We’ve gone to many cinemas with just foam on the walls, and there weren’t many issues. All “issues” that acousticians worry about – reverberation times, modes, acoustic imaging etc – are not so important. Most listeners are oblivious to these issues and are not as bothered by it. You don’t need the room to be like an IMAX theater to enjoy a movie! This “ideal” room with even reverberation time, even frequency response, extremely low noise and high clarity is not that big a deal. Why should we even consider doing something like this?”
Well, we have some clever justifications for why you should carefully design the acoustics of your home cinema. This is basically your soundproofing and acoustic treatment,
Why Soundproofing?
When we say soundproofing, we are referring to a box-in-box system (we have explained this is detail later on). There would be a false wall, false ceiling and a raised floor in your cinema room, with insulation material and all sorts of anti vibration clips. You essentially have an inner box (your soundproofing) that’s isolated and insulated from your outer box (the structure of your room).
- Obvious advantage – Reduced sound leakage from the room going outside, you’d have lesser complaints from your neighbors, your entire house won’t vibrate when you watch a movie. You don’t have to bother turning down the volume.
- Not-so-obvious advantage 1 – reduced leakage into your room. This means that you have a reduced background noise level. This would ensure you have better clarity inside your room. You can hear even the quietest sounds from your sound system. You have lesser intrusions and disruptions from cars or trucks passing by or honking . Our ears adjust to this lower noise levels and you can even reduce the levels of your speakers and hear all the details of your movie at more comfortable levels! All in all, it improves the experience drastically.
- Not-so-obvious advantage 2 – soundproofing essentially acts as heat insulation! The inner box with it’s air gap and insulation would keep your room cooler and help “lock-in” that energy. Reducing the stress on your HVAC system.
- Not-obvious-at-all advantage – You can correct for acoustically unfavorable room dimensions (eg. dimensions which are in multiples) and do some clever tricks (sloping, making the room symmetric etc) to help your acoustic treatment. You can even get rid of imperfections and columns on the wall because you’re making a separate wall in front of it!
Why acoustic treatment?
When you are in a room with some speakers, you are not hearing just the speakers in the room, you are hearing the room as well. The reflections in your room give a characteristic tone to your room which colors the sound from your speaker as well. Extremely few might be lucky to have an awesome sounding room which elevates the response of your speakers without any treatment. (I’m yet to come across such a space). Think of it this way, you can have the best speakers in the world, but if your room doesn’t sound good, neither will your speakers.
- Your awesome speakers will sound bad in a bad sounding room. “Decent” speakers will sound even worse!
- But if you have a really good sounding room, your awesome speaker will sound as awesome as they should be. Even your decent speakers will sound really good!
- You get a better “surround effect” when the room is treated. You can make your home cinema according to the same standards as commercial cinemas. Maybe even better!
Simply put, the acoustics of your room play an enormous role in how good your sound system is. It makes a world (or a room?) of difference!
What about budget and cost?
First of all, the cost of soundproofing and acoustic treatment is going to be only about half (ballpark) as much as a good cinema system including the cost of seats, speakers, amplifiers, processors, projector, screen etc. When you are spending so much on your equipment, it makes sense to get your money’s worth by being able to make your cinema experience as good as it gets by investing just a little bit more on treatment!
Secondly, doing this the first time around is a lot cheaper than doing this at a later stage.
If you have to do the soundproofing and treatment after the room is finished,
- You will have to take down all the things on the wall and ceiling and start over.
- You will have to extend cabling for your speakers, lights, switches by 10 – 25 cm, because of the soundproofing.
- The cost of finishes, such as paints, wall papers, tiles is wasted. (You might be able to reuse the carpet though).
- The cost of treatment for this space, is over the cost you spent for making the room with all its finishes!
We highly recommend doing this the first time around.
WILDCARD Justification
In case none of the above objective reasons are convincing enough, here’s a subjective one – you would probably use your room more.
When you have a space that sounds as good as a commercial cinema (dare we say, better?), you would use that space more. You could watch your sports events on a large screen, get the full gaming experience with surround sound, or listen to your favorite music with ridiculous clarity. You would genuinely be excited to use that room. It’s like that feeling when you buy a new headphone which sounds awesome- don’t you use it more? Think of your room as a giant audiophile headphone with a 4K screen, because that’s what it is!
If this justification doesn’t make much sense, hey, its a wild card.
To summarize,
Why should you do this at all?
- Quieter room with lesser interruptions
- Higher clarity with lower background noise
- Better immersion and audio quality. (Much better, trust us.)
- Better value for money and utilization of your equipment and space.
Why do you need a professional team to do this for you?
- Improper soundproofing makes the sound and vibrations from the cinema room spread everywhere in your building.
- Improper acoustic design and absorber placements will lead to uneven reverberation times. Making the room sound too “boomy” or “shrill”.
- Improper acoustic treatment ensures that you will not achieve the true potential of your sound system. In some cases it can even make the room sound worse!
Hope this brief explanation has convinced you to give more weightage for acoustics when designing your cinema. You can read more below if you’re interested in seeing how we generally design a medium sized home cinema.
How we design home cinemas
We have to establish first that this article applies to considerably larger rooms than our average living room. A good starting size would be about 9m(L) x 4m(B) x 3.5m(H). These are rooms that you could spare to keep aside ONLY for cinema (and really good audio). Considering the level of treatment that would go in to get really good “surround” effect and immersive cinema or movie experience, it would be quite difficult to use this space for anything else. Let’s go into how we at SMT Acoustics design home cinemas.
Basic design and placement
There are many factors that have to be considered when designing a home cinema. But a large chunk of your design comes “automatically” when you take care of basic requirements of a cinema.
- There needs to be direct line of sight to the screen for all the viewers. You can’t spend a lot of money on this home cinema and have someone’s head blocking the bottom half of the screen! So, in essence, each row has to be raised. Usually about 30cm height between rows. When every person can easily see the screen, you can automatically assume that every person can easily hear the sound (at least from the screen).
- You want a screen as big as you can. (or else, what’s the point?) This is limited by the width of your room and horizontal and vertical viewing angles. If the screen is too wide, you’re going to have to “scan” to see all the details on your screen, so it ends up being uncomfortable. The horizontal viewing angles are matter of preference, but recommendations for this angle ranges from 30 to 60 degrees. But then again, it’s a matter of preference. Vertical angles recommendations don’t exceed 35 degrees. Or, simply put, you shouldn’t have to look “up” or “down” more than 35 degrees.
- The placement of speakers, however, is not a matter of preference. There are established guidelines by surround standards (eg. Dolby Atmos) for this. This has primarily to do with the angle of placement, rather than the distance. This is because our brain uses the time delay between our left and right ears to “guess” where the sound is coming from. (Of course, it’s way more complicated than that, there is the “HRTF”, which is a beast of it’s own!). This time delay is only dependent on the angle the sound is coming from. Regardless of how far or close the speaker is. So if the speaker is in the wrong angle, our brains guess they are in the wrong “place”. Dolby Atmos for example, which places an object in space, uses all the speakers in your surround to do so. If your speaker placements are wrong, so is the placement of these objects in space. In really bad cases, you wont get this effect at all!
The left and right speakers work best when they are 60 degrees apart. If it’s 90 degrees apart, or 30 degrees apart it’s not going to give you good stereo effect. The angle between your speakers is more important than the distance between them. Having the LCR speakers behind the screen, well, makes it sound like the sound is coming from the screen. As much as having the speakers behind the screen is awesome, if the angles of the LCR isn’t in range, don’t do it! Put only the center speaker behind the screen. Whichever surround standard (Atmos, Auro 3D) and configuration (7.2.4 or 5.1.2 etc.) you decide to go with, follow the angle placements. This is done for the “sweet spot” of the room, but in theory it is possible to divide your room into “zones” and have surround that works best for every row, but this would require careful design.
Surround works best when all the speakers are at the same distance from the center. A unit circle if you may. But since most rooms are shoe boxes, and you can’t have speakers blocking pathways, they have to be on the walls and ceiling. Which all of them are at different distances. All of them have the sound reaching the listener at different times, even if the angle is correct. This can be corrected easily by adjusting the delay to each of the speakers. You essentially set them to according to the furthest speaker so all the speakers sound like they are that far apart. As mentioned earlier, this doesn’t affect your brain from processing where the sound is coming from. Estimating this delay though, is a bit of a pain. While most surround packages come with tuning kits etc where the manufacturer helps you out quite a bit. We (acousticians) would go for a more elaborate and complicated series of sine sweep measurements to set this right. We would use the same set of measurements to adjust EQ and levels as well.
When it comes to speaker selection, you’d need more power speakers and amplifiers than the regular surround system you can buy in your electronics store. Atmos specifications for example, for a full blown cinema, you require 105dB SPL at the reference point. We want our home cinema to be as good as its bigger counter parts, we need to achieve at least somewhere close to this. Our smaller surround systems for living rooms won’t be able to deliver this much SPL at the distances we are designing for. You’re going to need bigger cinema speakers. (But not too big, your equipment supplier would be able to assist you on this for sure.)
All the speakers should be aimed towards the seats. You don’t want speakers pointing towards random places of the room as this does no good. - Lastly, you’d want your room to be symmetrical about the length to get the best stereo image. The seats, screen and speakers have to be placed considering this symmetry. If your screen is towards one side of the room, the sound would appear stronger on that side. Acoustics is weird in that way.
By the time these factors are considered, i.e. the seats, screen, and speaker placement, you end up with the basic layout of your space. Keep the door towards the back of your room if possible so that it has minimal effect to the sound. For best symmetry, the door would have to be at the rear wall, in the middle. Behind your last row of seats. You’d have to consider for railing and steps and all other basic necessities for getting around (the boring stuff). Then, we go into the stuff that we specialize in, acoustics!
Soundproofing
We start off with soundproofing, and why this is so important. When it comes to a good cinema, with comparatively large speakers, delivering 105dB SPL at reference point, its going to be pretty loud in there. So it is crucial that you employ soundproofing solutions so that you don’t have your neighbors complaining every time you want to enjoy your cinema. Moreover, you are going to have this sound leak into the rest of your house as well! In most cases, this is an afterthought, many consider doing this after they have done all of the installation.
Why not? You could always see how bad it’s going to be and consider it then. The issue is, doing a retrofit for soundproofing requires you to take down all of that you installed to do it right. Which would make it considerably more expensive than doing it the first time around. Also, regardless of how much any supplier tells you a certain material can magically absorb all the sound, what they don’t tell you that the materials are tested in ideal conditions which don’t exist in the real world. In the real world you have a floor, ceiling and wall that’s connected rigidly to each other.
In the case of Oman, where the author practices, almost all constructions in residential homes employ block walls. 20cm cement block walls plastered both sides are rigid and they work quite well in reducing airborne sound. All that mass definitely helps! But they perform poorly in reducing structural noise. So a cinema with only block walls will have sound that passes through the structure through its entirety. Sound travels better through solids than through air. All of the sound that passes through the structure is mostly the bass, where your wall is doing poorly any way. So if you have the above mentioned magical material on your wall or ceiling, you still have sound that is not absorbed (especially low frequency energy) passing through the structure. And they would be heard everywhere in your house! So we need to employ the best practice used in soundproofing – the box-in-box system.
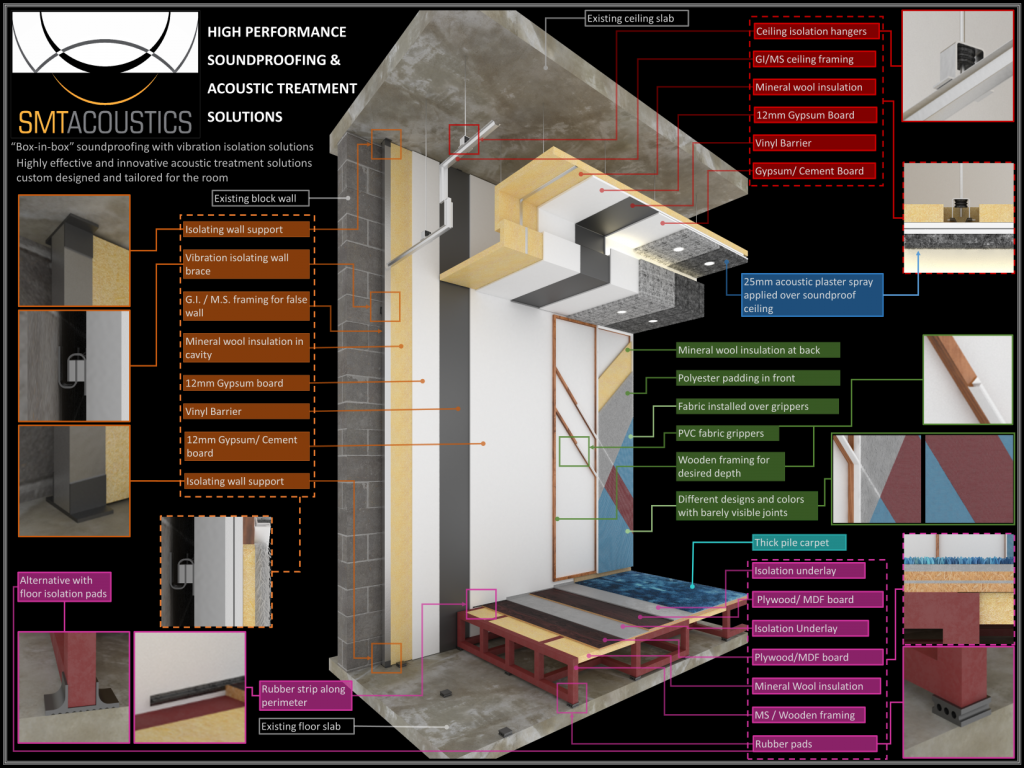
Box in box
This name gives away the “system” in essence. It’s a box that we’d make inside the existing box, which is the existing wall, ceiling and floor of your room. You’re essentially making a false wall, false ceiling and floating floor over the existing structure. There is data for such standard constructions and the insulation performances we can achieve from such installations. For example, a block wall with a 10cm false wall in front would should give you an insulation performance Rw ~55dB. But these single values again don’t give the full picture. (The procedure is difficult to explain simply so we won’t go into detail).
If the false wall is installed over the block wall, any rigid connections (framing for eg.) will act like a short circuit and allow the sound to pass through the structure. Essentially, the insulation performance (Rw/STC) doesn’t reflect the low frequency performance so again, this isn’t good enough! To get better low frequency insulation without losing all the space in your room, we employ vibration isolation methods.
What we’d do is include vibration isolation clips, hangers and pads into the false wall and ceiling. So that the inner “box” is disconnected from the outer “box”. More science goes into selection, of course. Additionally, double layer gypsum boards are good in this case as they add more mass and when installed in a staggered fashion, they make the wall more rigid. Along with this entire thing, we add a barrier in between, which increases the mass and reduces leakage further. Again, more complicated science lies underneath. Same goes for flooring, we make the floating floor truly floating when we put rubber pads or isolators between the frame and the floor slab. We fill the cavity with mineral wool insulation before closing up.
More things come into picture, like electrical conduiting, HVAC ducting, speaker cabling, speaker boxes (for flush mounting) etc. But all in all, we want an inner box that’s sealed to the outer box. And all the things that make noise is inside the inner box.
You should then round the entire thing off with a soundproof door, with good gasket seals and a bottom threshold. There are various designs and rating for this, but if you can do a double door with a lobby, this would give you the best soundproofing. As the ratings improve, the designs can get quite complicated and expensive.
Same goes for your windows (if there are any). We always recommend hinged designs with good double glazing (10mm Glass-12 mm gap – 10mm glass). In an ideal scenario there wouldn’t be windows in the cinema room. This messes with the brightness and contrast of your image on the screen unless you do some really good black-out methods with some heavy, multi-layer-sandwiched curtains. You can always close off the windows for good when you do the soundproofing.
There are many advantages to doing this box in box system, that we listed in the beginning. But let me emphasize on this again,
- Obvious advantage, reduced leakage from the room going outside, lesser complaints, your entire house doesn’t vibrate when you watch a movie.
- Not-so-obvious advantage 1 – reduced leakage into your room. This means that you have a reduced background noise level. This would ensure you have better clarity inside your room. You can hear even the quietest sounds from your sound system. You have lesser intrusions and disruptions from cars or trucks passing by or honking . Our ears adjust to this lower noise levels and you can even reduce the levels of your speakers and hear all the details of your movie at more comfortable levels! All in all, it improves the experience drastically.
- Not-so-obvious advantage 2 – soundproofing essentially acts as heat insulation! The inner box with it’s air gap and insulation would keep your room cooler and help “lock-in” that energy. Reducing the stress on your HVAC system.
- Not-obvious-at-all advantage – You can correct for unfavourable room dimensions (eg. dimensions which are in multiples) and do some clever tricks (sloping, making the room symmetric etc) to help your acoustic treatment.
If you have any shared HVAC ducts (connecting cinema room to the adjacent room), we suggest installing acoustic lining (20-50mm PU foam or other lining material) inside the duct. To absorb the sound leaking through the ducts. It’s best if you could have a separate unit or duct for the cinema room. Having lining in the duct also reduces air flow noise from your HVAC duct.
Then we go into the final step of our design, Acoustic treatment! It must be noted that all acoustic treatment for the room should be done on the soundproofing or the inner “box”.
Here’s a small schematic to make the layers easier to understand.
Acoustic Treatment
Now that we have designed the soundproofing of the space, which will ensure that all the sound in the room stays in the room, and nothing comes in from outside, we can go forward with controlling the sound within the room. At this stage you have a room with rigid walls, ceiling and floor. So it’s going to have a lot of reverb. You have a lot of reflections bouncing around the room, reaching you at a different time, making it difficult to understand anything. Which is a given for larger rooms. To get the best surround effect, to take the viewer to a different place and make it as immersive as it can be, you need to take the room you are in out of the equation.
Which means the room itself should color the sound very little – we have to absorb as much of the reflection as possible. The lower the Reverberation time, the better the immersion. But we should try to get this with extreme caution. As you throw absorbers all over the wall and ceiling, certain “artefacts” and issues specific to your room will come out. Most notably flutter echoes and standing waves.
As opposed to much larger rooms, the primary “modes” in our room is definitely going to be an issue. Modes are basically frequencies with wavelengths that match exactly with the dimensions of your room (and its multiples). These frequencies tend to stand out more. Some of it can be sorted out by some careful design of our soundproofing. The solution is simple, you’d want as broad as an absorption curve as you can get, and loads of it. But this is quite a complicated issue.
Too much high freq absorption (carpet, foam etc) and you’ll have a really low high frequency RT, but the low frequency RT will be too high in comparison! So you’ll get “ringing” or “one note” problems from your low frequency energy. Moreover, when you occupy the room, the human body with our cozy clothes will absorb more of the high frequency. Making things worse! This makes things sound too “muddy”.
Trying to focus on the mid and low end energy alone, by putting perforated panels for example, you run into other issues. These panels work mainly by resonance. So put too much of one “type”, you’ll have a really low RT in just one octave band! (The problems just never end!) But kind-of-broadband absorption with our false walls help extend the absorption to the lower frequency bands. Since this is kind of what sets us apart from our local competitors, we won’t spill all we know.
That is why we never use the same design twice. We design each space separately, with a different concept altogether. We find the first reflection point for each speaker and throw absorbers there. Then we do the bass traps, edge absorbers and throw in some hybrid diffusion as well. All absorption employed for the room should come over the soundproofing. Basically inside our inner box.
There are three main approaches that we go with, (now this is going to be slightly boring, see the cool pictures though)
- Complete cladding
- A highly absorbent ceiling with an “acoustic plaster” which at 25mm gives us NRC 1.00. (Along with the false ceiling, this gives us some fairly broad absorption)
- Fabric wall with grippers with height variations for areas where high absorption is needed. (Might have “layers” of special things we come up with.)
This cladding covers the entire wall. Including behind the acoustically transparent screen. - Bass traps and edge absorbers integrated into the fabric wall. (High density mineral wool with (again!) special things we can’t tell you)
- Thick pile carpet over underlay (closed cell underlays improve the absorption in mid frequency)
- Speakers flush mounted into the acoustic cladding. Acoustically transparent screen if the design and budget permits.
Some examples of such a design
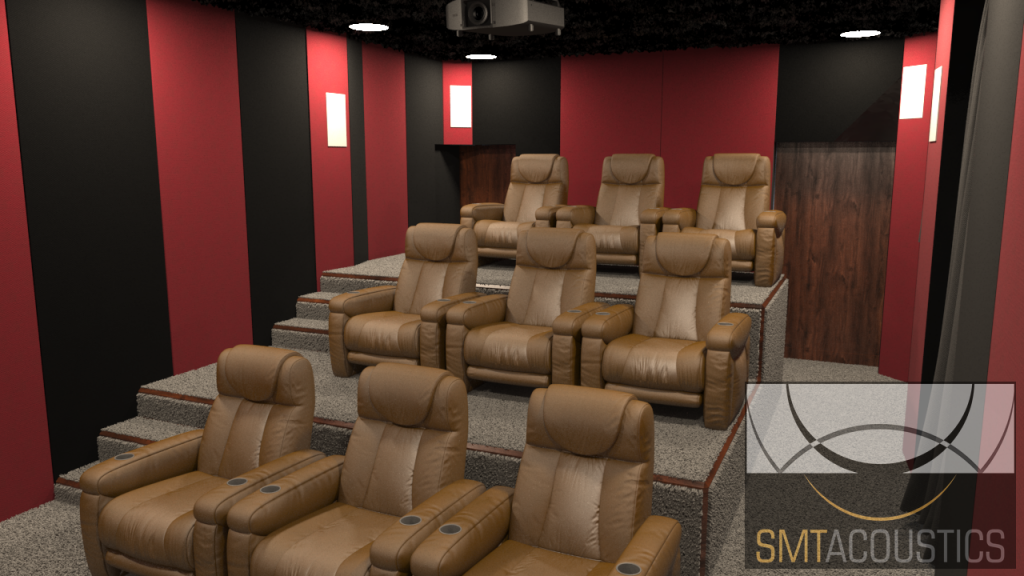
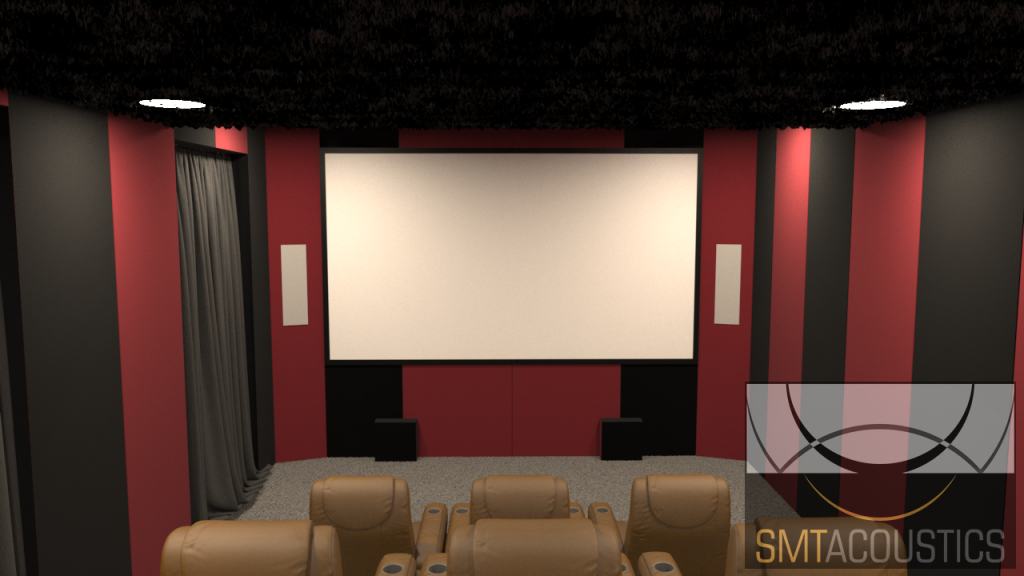
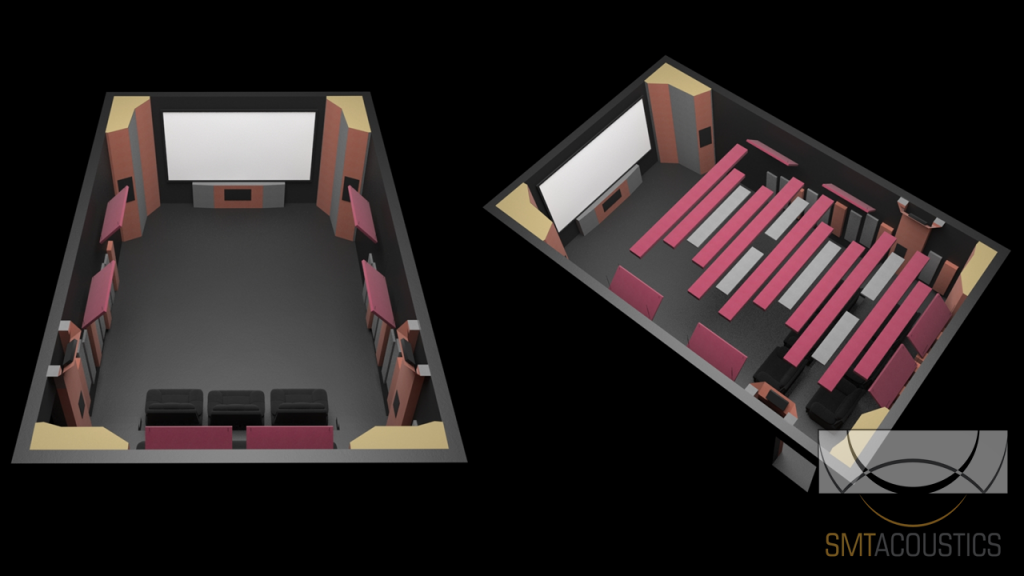
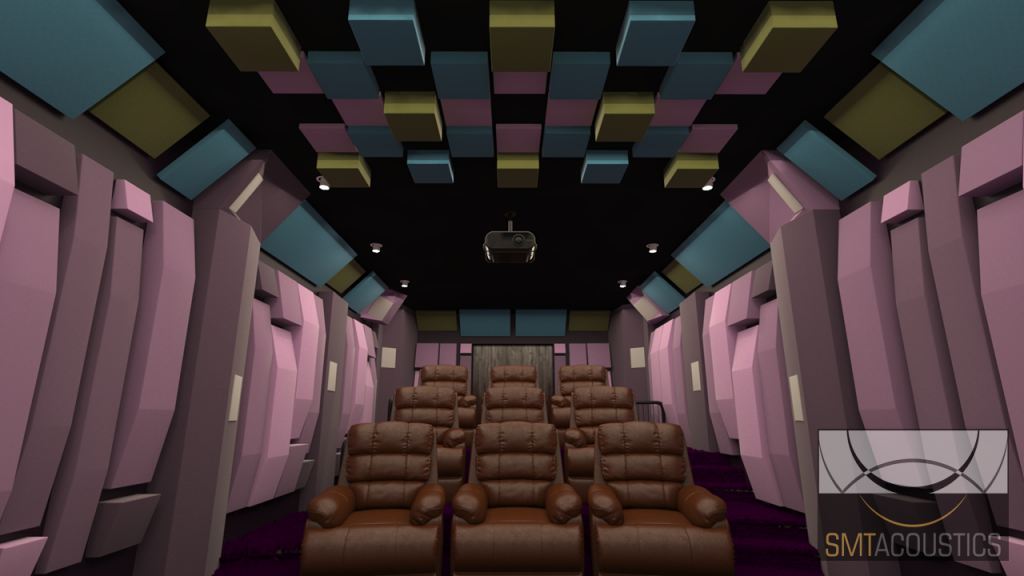
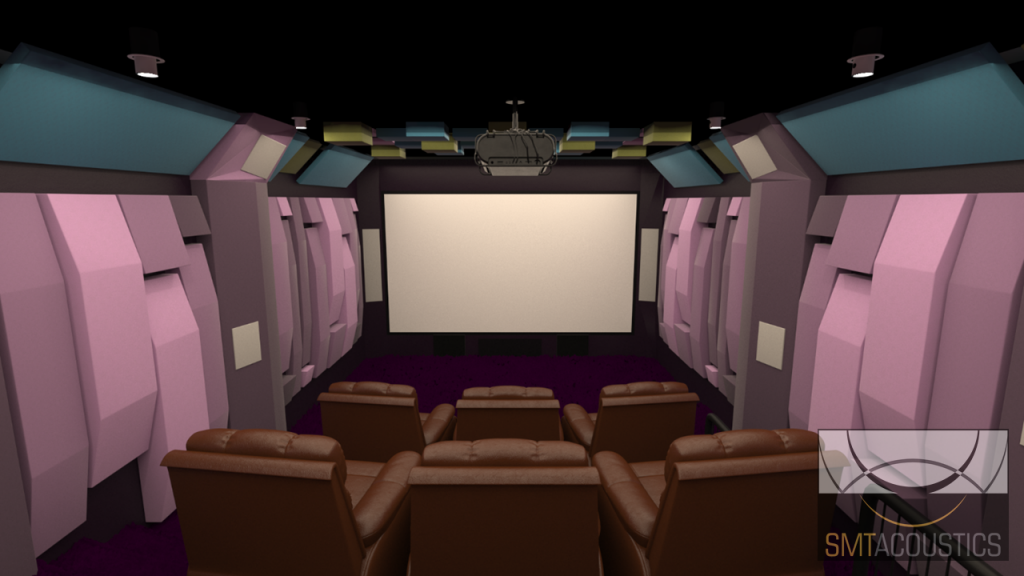
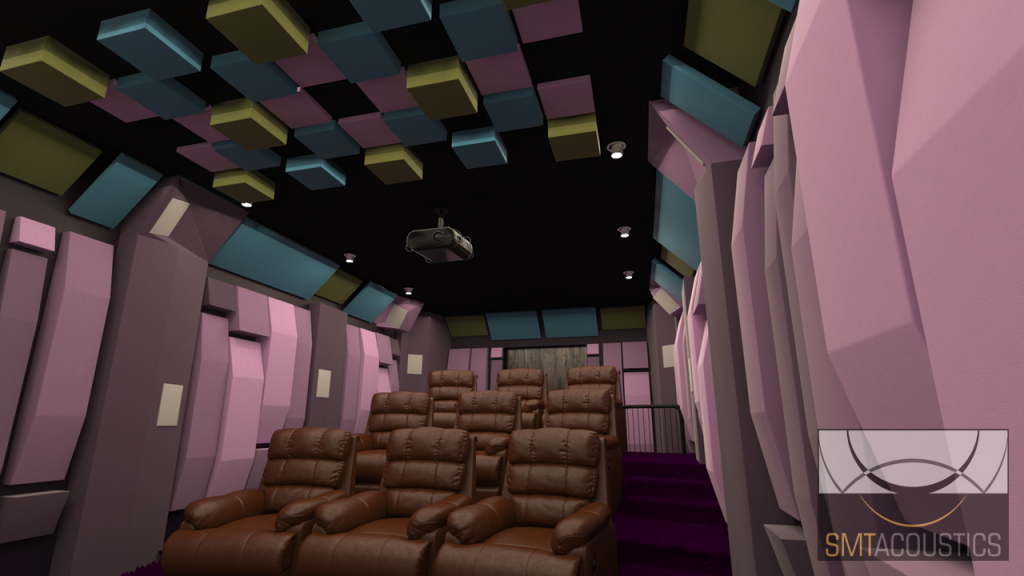
- Individual panels
- This is always proposed as an alternate option, since this tends to be slightly cheaper.
- Acoustic plaster on the ceiling over soundproof wall. (Black)
- Individual wall and ceiling panels at the first reflection points. With different heights and sizes to get neat patterns.
- Speakers integrated with absorber panels, bass traps and edge absorbers.
- Thick pile carpet with underlay
- As expected the RT would be slightly higher than a complete cladding. But the height variations and arrangements give us some diffusion as well, eliminating most of the artefacts.
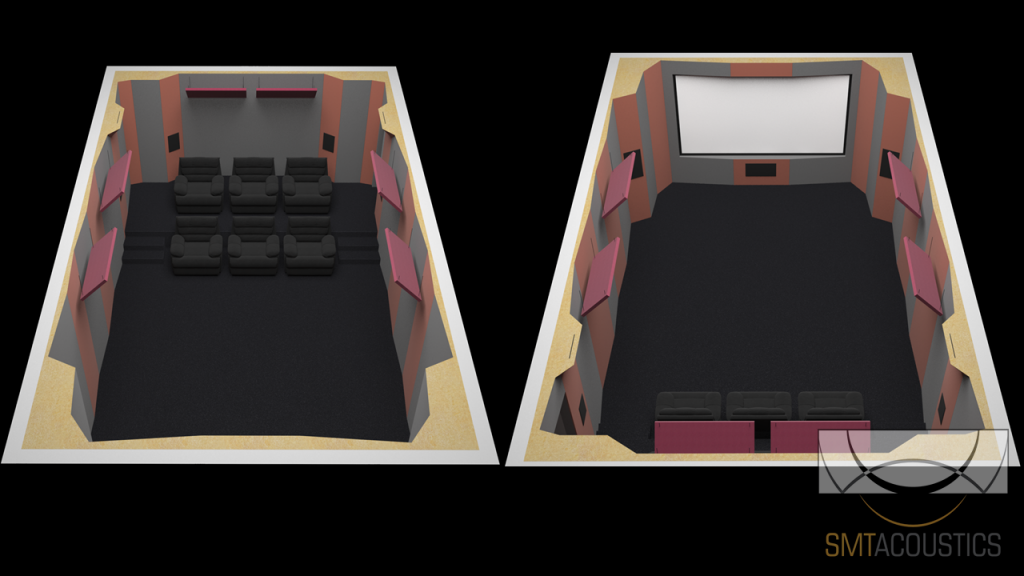
Here are some examples for such a design,
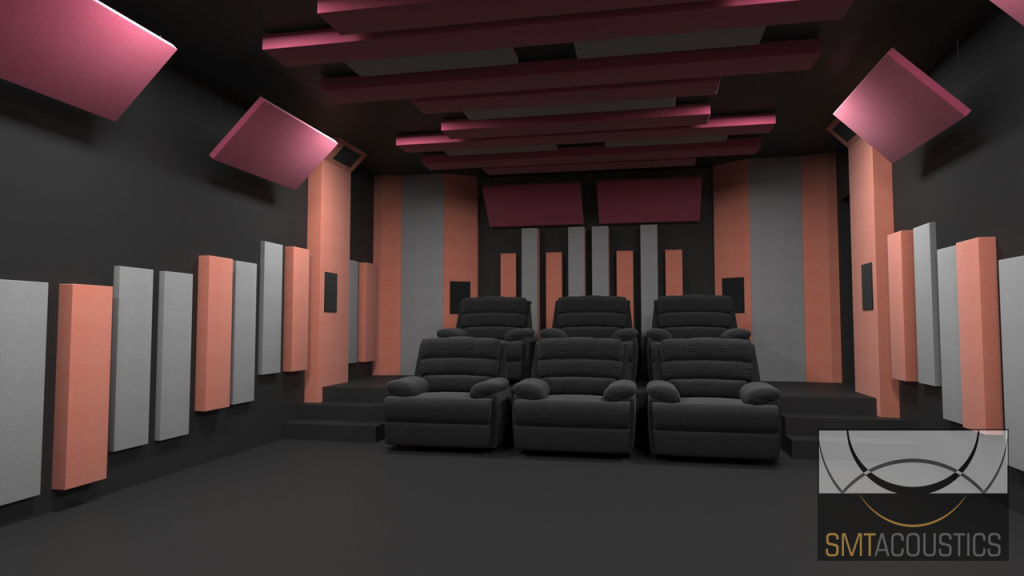
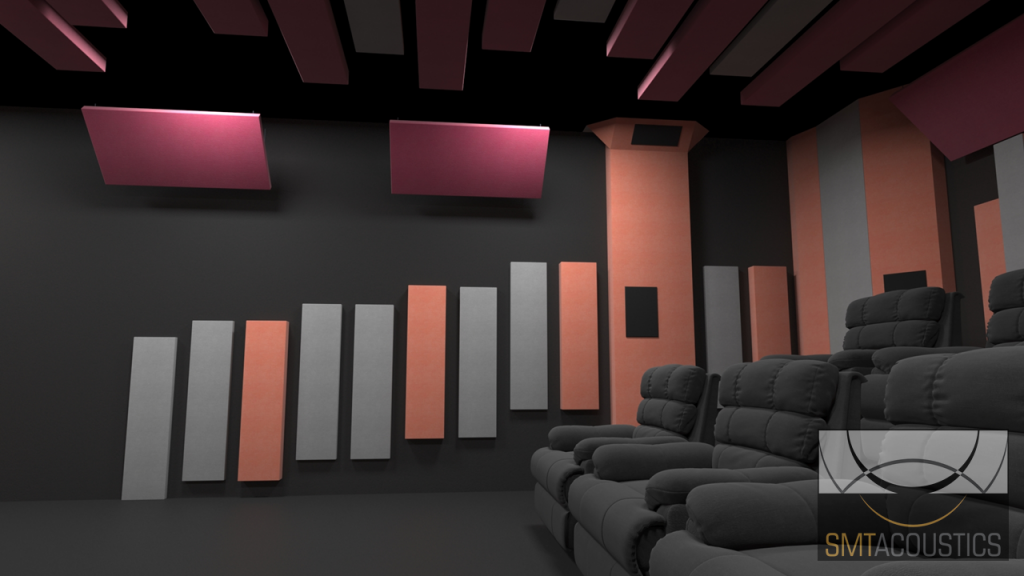
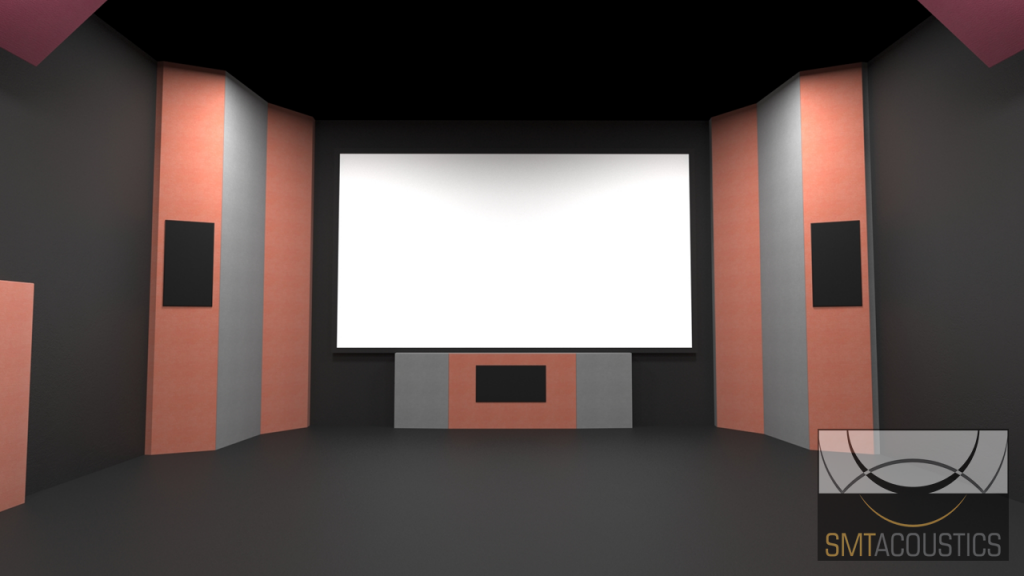
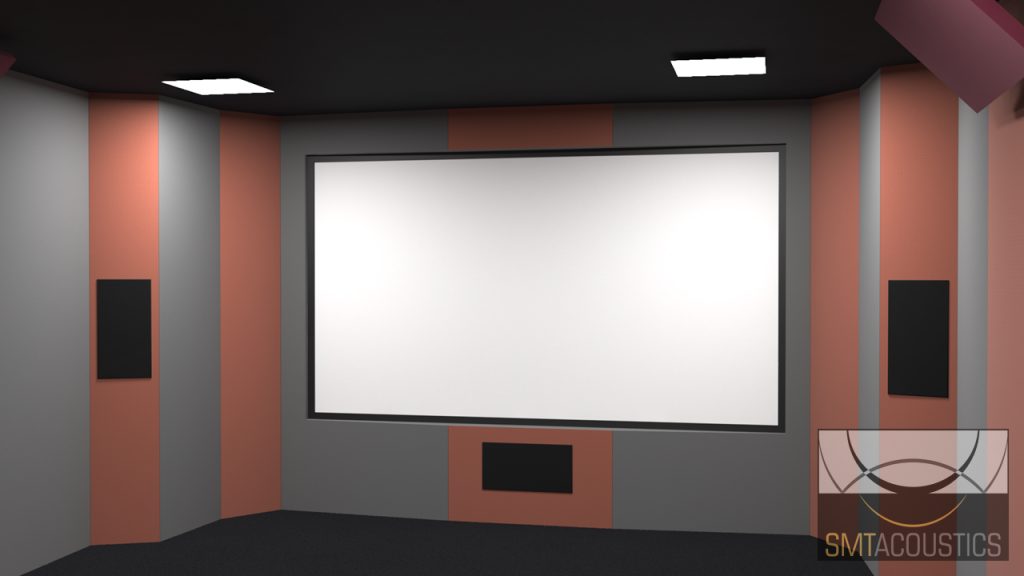
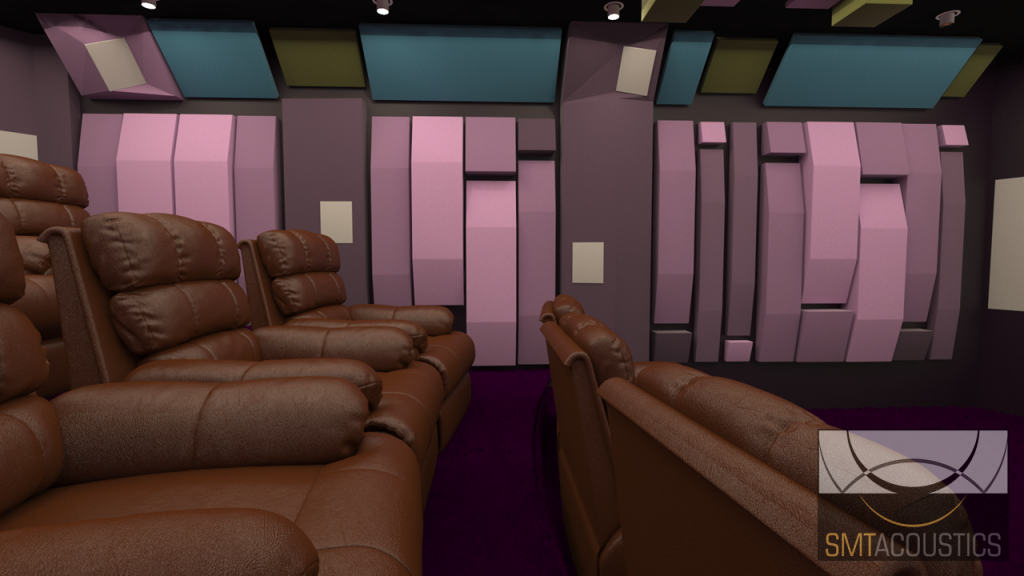
- Hybrid design – This is where we incorporate both!
- Acoustic plaster over ceiling with additional panels in main reflection zone.
- Fabric cladding for screen wall and other areas. Might incorporate woodwool or other materials in the layers.
- Separate absorber panels with parametric height variation. With rigid frame to give us diffusion for lower frequency bands.
- Bass traps integrated into fabric cladding.
- Thick pile carpet over underlay.
Such designs vary for each room. Undoubtedly, this will provide the best performance for the cinema room. Here is an example,
Conclusion
Hope this article made some sense to the person considering on investing on a cinema room or to a contractor looking to understand how it’s done. I’d like to think I have managed to shed some light on the elusive subject that is as complicated as it is wonderful. Thanks for your time! Contact us if you’d like to learn more.